Holy Cow!

Tuesday, November 15, 2016

Holiday Extravaganza in NYC...

 We made 22 Christmas cards at the "Holiday Extravaganza" that I attended this past weekend sponsored by the Ink Pad in NYC.  Our instructor was Cheiron Brandon, a former design team member of a number of different stamp companies.  These are all her designs.  For those of you actually counting, you're absolutely right, there's only 21 in the picture.  One of mine got lost between class and home... :(
 
 I loved this technique AND the final result.  We put paint on a stencil, spritzed it with water and laid our watercolor paper on it.  The stencil is from a set by Tim Holtz WHICH I WON AS A DOOR PRIZE!!  Woot, woot!  And not only that, the set is SIGNED by Tim Holtz... :)
 
 We stamped a wood grain stamp on white paper with a light distress ink for the background.  Die cuts and Nuvo drops were used and I see I missed a few berries...
 
 LOVED this one so much that it may be our personal card.  Although they had a "pop-up" store at the facility, I purchased the stamp set online for $10 less.  It's from Stampers Anonymous.  I was sad though, to discover the "string" they are hanging on comes from another set...
 
 Also in our class was the owner of Neat and Tangled.   This set is one of hers called "Scandinavian Prints Christmas"...
 
 Another Neat and Tangled stamp set called "Beary Merry"...
 
 ALL stamping here... pretty fun!
 
 We used distress ink thru a stencil for the effect in the background.  Die-cut by Neat and Tangled called "Merry and Bright"...
 
Another Neat and Tangled stamp set called "May Your Holidays Be".  The Die-cut background is called "Star Cover Plate".  We were rushing around the last half hour to finish some of our cards  we hadn't gotten to that I forgot to stamp the "Merry and Bright" stamp in the center of the ornament.  So, once home, I used this "Merry Christmas" from Close to My Heart. Also, when I assembled this at home, I accidently put it on upside down.  It's been a LONG time since I did that...
 
 Neat and Tangled "Elfs and Their Shelves"...
 
 Lawn Fawn "Home for the Holidays"...


 Lawn Fawn "Winter Unicorn"...
 
Lawn Fawn "Cheery Christmas"...
 
I thoroughly enjoyed the class.  I met some really nifty people at my table.  The young lady next to me is in the Army, visiting from Alaska, home for the holidays, at the class with her mom.  If I can work out the transportation issue I had, I'd definitely do this again.  It took me over FOUR hours to get home!  Damn PATH train...
 
SO, this ends my "Five Christmas Cards a Month" Challenge until January!  Of course, now I have to make our personal ones but it's still great to go out with a bang... :)


Sunday, October 16, 2016

Ut oh! Only three...

 I borrowed this image from a friend.  It's a Penny Black called "Deck the Halls".  Wicked cute!  I have no clue why I only stamped three.  I ALWAYS stamp five when it comes to Christmas images.  THAT MEANS, I need to make two MORE Christmas cards before the month is out.  Wish me luck, as my schedule goes into double time for the rest of the month... ;)
 
I colored these at Susan's yesterday and created the cards today.  The sentiment is from a Close to My Heart set that I own called, Pear & Partridge Cardmaking Workshop.  I added vellum behind the image to tone down the red stripes (a trick I saw in one of my groups) and added twine and brad from my stash for a little interest...


Tuesday, October 11, 2016

Sending my love...

 I borrowed the "Sending My Love" stamp set by Unity Stamps from my friend Susan a couple months ago.  Since I've added a good twenty Copics to my collection in the last month, it's been incredibly fun to color images.  Before I return the set to her this weekend, I'll be sure to stamp up several more images to color at another time...
 
The paper is from a paper stack I've had forever but I'm out in Ohio and can't tell you from whom the pad came.  Miscellaneous burlap, sequins and ephemera from my stash.  Along with twine from my Etsy shop.  Now, I'm off to put these in the mail to friends who could use a smile...


Friday, September 30, 2016

September Christmas cards...

 I received a HUGE box of rubber stamps from Scott's mom over the summer and FINALLY made time to use one of them... it's only ONE of hundreds in that box!  Ou vey!  The stamp is made by Hero Arts called Kris Kringle dated 1996... wow!
 
 I started coloring this, off and on, at the beginning of the month.  It was all finished except for mounting on the card back on the very last day, almost the very last hour...
 
This morning, October 1st, I added the twine and heart brad and put glossy accents on the fur of his coat.  There sure was alot of work involved in coloring this so, it definitely won't be our personal card, but it was really fun to do...

Monday, September 19, 2016

Stuff around my desk...

 SO, I was doing some rearranging in my Studio (getting ready for a Scan 'n Cut to come live) and had quite a stash of miscellaneous paper and ephemera in a pile next to my work space.  Instead of figuring out where it should live or putting it away, I decided to make a few cards from it.  Not a bad collection... :)
 
 This one used two chipboard frames stacked upon each other, leftover paper from 6" x 6" pads, star paperclip, chalkboard circle and ephemera from my Project Life stash...
 
 Paper from 6" x 6" pads, frame and ephemera from my Project Life stash and twine from my Etsy shop..
 
 Same as above AND enamel dots made with NUVO crystal drops, a freebie from one of my Scrapbook Expo classes...
 

Five cards, not bad.  The rest of the stash had to find a home.  I can't possibly be creative in this mess... ROFLMAO :)


Friday, September 9, 2016

Demo cards from Scrapbook Expo...


At the RUBBERNECKER booth of Scrapbook Expo, I had the pleasure of watching the creator of these stamps do his magic.  He gave me the two I watched him make and I turned them into the two cards you see here, once I returned home.  I purchased two stamp sets from him.  One is called Poppy Bunch #926 which I created and turned into tags.  I'm still not sure where I'm going with these yet but I'll post them when I do.  And the other is Freehand Frame.  I used it around the two images I turned into cards.  WICKED cool stuff!! :)
 
At the Sizzix booth, they were demoing a die-cut set that makes this card.  Since I was the ONLY one watching the demo, she asked me to pick the papers.  She cut all the pieces EXCEPT the middle white piece.  She said she forgot to bring that die.  Now, to me, Cindy OCD, that is completely unacceptable!  I was ready to throw the whole thing away when I got home.  I found it useless without the middle piece.  WELL, my house guest, Miss Jeanne, wasn't going to let that sit!  Not no way, not no how!  She created a template for me that exactly fit the middle.  I used it to trace around this sentiment from my stash and voilà I have a card I will use... aren't crafty friends THE BEST?!!
Love you Jeanne... :)


Tuesday, September 6, 2016

Cards from Scrapbook Expo...

 At Scrapbook Expo last month, I took a class called "Layering Background Stamps" put on by JustRite Papercraft.  It was very, very fun!  Not only did we work on the backgrounds for these three lovely cards, we went home with a stamp set AND a background stamp.  Talk about BANG for your buck... :)
 
 We did a technique called "smooshing".  Using Zig markers on a piece of acetate, we added water and moved our cut watercolor paper over it.  Then, with different background stamps, gelatos and inks, we added to the background.   I took this class with Jeanne and while at her house last week for an overnight, we did our best to complete these cards. With crisp black ink, we stamped our image over the whole card.  What a lovely effect... 
 
Using Jeanne's "celebrate" sentiment, I heat embossed it on a partial piece of background with black embossing powder...
 
Jeanne also had some silver paper and the connected stars die-cut, I think from Simon Says Stamp, that I used and added to this card...
 
All our goodies AND written directions to do it all again.  One of the things I was really pleased with, besides the "take home", was that the instructor did not have us do the stamping in class.  So many times, first stampings of a new set DO NOT come out well.  Rather than do all this work on the background and then spoil it with a bad print, she sent us home to do it.  I SO VERY MUCH appreciated that...
 
Jeanne also did a blog post on her cards which you can see HERE ... :)


Friday, September 2, 2016

Cards, cards and more cards...

 I have this little box where I put random backgrounds and partial pieces from cards I've done in the past.  As you can see, it's overflowing!  My goal today was to create or finish at least ten...
 
Without too much effort, I completed a dozen... woot, woot!  I'm on a roll!! NOW, I'll try to find as many people to whom to send.  I wonder if I'll be just as productive with that... :)
 

Wednesday, August 31, 2016

My Five for August...

Can you get any closer to the end of the month than this?  I've been working on these images, off and on, for most of the month and finally finished them at Jeanne's house this morning.  The moose is an image she loaned me to color, made by Stampendous.  I stamped seven images and spent SOOOO much time getting them perfect...


I could not have been more pleased with the outcome!  I LOVED the coloring.  The paper is from My Favorite Things, bling from Pretty Pink Posh, ribbon from Michaels, sentiment from Lawn Fawn, stitched die-cuts from Simon Says Stamp.  ALL of the above belonging to Jeanne and at my disposal when I stayed the night.  LOVE having crafty friends!!  Thanks Jeanne... :)

Sunday, August 21, 2016

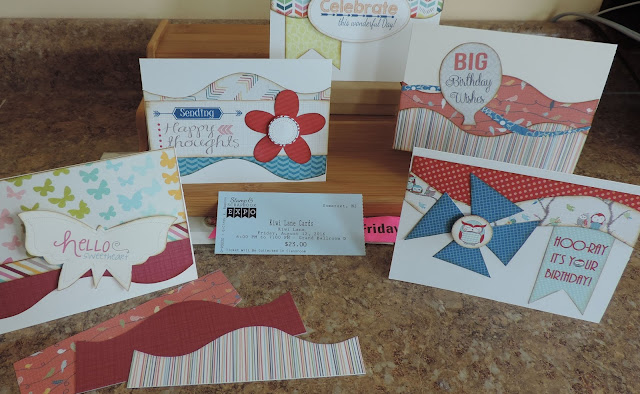
Kiwi Lane Class at Scrapbook Expo...

 At Scrapbook Expo last week, I took four classes.  I love learning and making new things and stepping out of my "norm".  These cards definitely fit the bill.  Of the four classes I took though, this was my least favorite.  And it has nothing to do with the cards we made.  It was the instruction...
 
  I had no idea what "Kiwi Lane" was and if I hadn't WON the door prize, I would still not know what they were.  They are apparently, different hard plastic "Designer Templates" that you use to trace on designer papers and put together to create a card.  Our "kit" had ALL the paper already traced and we just cut.  That's it!  Just cut...
 
SO, paying $23 to ASSEMBLE five cards was pretty disheartening.  Like I said, if I hadn't won the door prize, I'd be pretty unhappy...
 
These are the "Designer Templates" I won.  I put mine on a ring and have them handy...


I hope I create more cards like this with my winnings because
they are VERY different from my norm... :)


Tuesday, August 9, 2016

Last year's Scrapbook Expo class...

 Scrapbook Expo will be back in town this coming weekend and I thought it would be prudent to finish LAST year's class cards.  These were from a class that I no longer remember the name of BUT, it was where I was first introduced to the ZIG Clean Color Brushes.  I took the class with Susan and although she LOVED the markers, she gave me her card kit... yay for me!!  After completing the cards, I made some matching envelopes with my Gelli-plate, stencils and acrylic paints...
 
 Today, these cards were kicking my butt!  Fussy cutting the butterflies was beyond aggravating!  IF ONLY I had a Scan 'N Cut.  Insert cheesy grin here... :)  ROFLMAO
 
Now, they are all completed and I can get ready for the NEXT set of classes I'm going to take... AND I'm going to enter this card in the SSS Wednesday Challenge, Let's Go Wild.